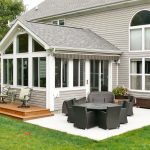
Adding a screen room onto your home is the single best way to truly enjoy the fantastic Spring, Summer and Fall months that we have in Illinois.
Whether it is because of the hot sun beating down in the middle of summer, or the mosquitoes that go into attack mode right as the sun sets. One of the most common things I hear is a complaint about a home’s deck or patio not being usable. Adding a Screen Room takes that outdoor area and not only makes it useable, but enjoyable.
So, what are the steps you need to take to get a new screen room built on your home?
The first step to building a screen room is to begin the design process and obtain a project quote. Here at TimberBuilt Rooms, we specialize in the design and build of screen room additions. We offer free, in-home design consultations at convenient times throughout the week. You cannot start a project without knowing the cost, so please take advantage of a TimberBuilt free design session.
After you have made your decision and moved forward with a project, the next step is to obtain a building permit. All permanent structures attached to your home require a building permit. If you hire TimberBuilt Rooms to build your screen room, then obtaining a building permit is part of the included project. To obtain a building permit, a set of drawings must be prepared. Most local municipalities require the drawings to be created and stamped by an Illinois licensed architect. This is also included in TimberBuilt Rooms scope of work.
Once the drawings and permit are obtained, the fun begins with onsite construction.
The first part of the project is to do site prep which would include any necessary removal and then to dig and pour concrete footings. Even though Screen Rooms additions do not have walls and windows, they still require a properly footed foundation. The required foundation in most municipalities is commonly called a pier foundation, which is similar to a deck foundation but a bit more robust in order to hold both floor and roof loads.
After the footings are in place, the next step is to build the floor. For screen rooms, generally you will want an exterior grade deck flooring. This is installed with space in between the decking so water can escape the room. The most popular option for decking is composite. Composite decking offers an attractive and ultra-low maintenance surface for the flooring of your new screen room.
After the floor/deck is built, it’s time to frame the walls. Framing a screen room should be done utilizing materials that not only look attractive when originally installed but also will not crack, twist, or deteriorate over time as the framing will be exposed to the weather on all sides. When TimberBuilt Rooms builds a screen room, we only frame out of dimensional western red rough sawn cedar timbers, commonly referred to as post and beam construction.
Cedar is a naturally beautiful wood that looks great stained, painted or even clear sealed. Cedar does not crack or warp like treated lumber. It is significantly more substantial in comparison to aluminum or treated posts. All cedar framing can be stained to match the home, so you won’t have to worry about something looking out of place as is often the case with prefab (aluminum) framing. When adding anything onto the home, you do not want the addition to look out of place, ugly or cheap. Adding something that is out of place, ugly or cheap often creates real problems for homeowners when they try to sell their home.
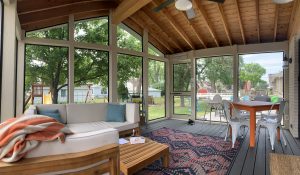
Roof framing and roofing should be done to match the home. In order to achieve a desired pitched roof, screen rooms are framed with roof rafters and the pitch of the room is custom designed to fit each home. This creates that grand vaulted feeling that is so desirable. The exterior of the roof is finished with shingles to match the home ensuring the structure blends in. Options abound for interior ceiling finish options. The most popular option is a T&G cedar interior ceiling with exposed cedar beams.
After framing the room, electric is installed. When done correctly, electricity in a screen room greatly enhances the usability of the structure and doesn’t add anything unsightly. At TimberBuilt Rooms we recess all conduit into the posts by creating raceways for the electric to run hidden from view. Outlets and switches must be exterior grade and covered as a screen room is designed and built to be exposed to weather. All TimberBuilt Screen Rooms include the installation of a ceiling fan as well as exterior lighting.
After the structure is built, one of the last steps is screening the walls in. TimberBuilt Rooms utilizes a system in which aluminum extrusions are miter cut, picture framing each opening and then a vinyl cap is pounded onto the extrusion tightly holding the screen in place. If any screens ever get damaged and need to be replaced, the vinyl cap is removed, a new screen cut, and the cap re-installed over the new screen. This system allows for extreme ease if a section ever gets damaged.
The final step in your screen room project is the caulking and painting. TimberBuilt Rooms handles all the staining/painting/caulking necessary to complete your screen room project. We can stain the room to match the home exactly, or we can seal or stain the room to allow you to enjoy the natural wood grains of the cedar.
Adding a screen room addition can truly be life changing. If you want to enjoy your outdoor space, consider giving us a call at 630 443 7100 to get a quote for adding on your screen room addition today!